Screen Share Online Manual
What is Screen Share?
Screen Share" is an application that allows you to use your Windows PC, smartphone, tablet, or Google TV as a wireless external display for your PC.
Screen Share" can be used in combination with the following two applications
- Screen Share (Host) application
This application is preinstalled on Fujitsu PC FMV. By connecting to the "Screen Share (View)" application, you can use your Windows PC, smartphone, tablet, or Google TV as an external display for your Fujitsu PC FMV. - Screen Share (View) application
This application connects to Fujitsu PC FMV to display the screen of an external display. It can be separately installed on your Windows PC, smartphone, tablet, or Google TV from their respective stores.
How to get the Screen Share (View) application
To use "Screen Share", you need to install the "Screen Share (View)" app on the Windows PC, smartphone, tablet or Google TV you wish to use as an external display and connect it to the "Screen Share (Host)" app. Screen Share (Host)" app. You can download the app by scanning the QR code below with your device's camera, by clicking the button to open the store page, or by opening the store on your device and typing "Screen Share" in the search field. Please install the application from here.
| Tip! The "Screen Share (View)" application can be installed free of charge from the Microsoft Store, App Store, or Google Play Store depending on your device. |

Table of Contents
- Application Screen Explanation
- Initial launch and preparation of the Host application
- How to start using (local network connection)
- How to start using (Wi-Fi Direct connection)
- How to start using the service (Mobile Hotspot connection - read the QR code to connect)
- How to start using (Mobile Hotspot connection - how to set up the connection manually)
- Operation after start of use
- Disconnection
- Exit Screen Share (Host)
- Each item in the application settings
- List of keyboard operations
- precautions
- Devices supported by the View app
- Q&A
- Troubleshooting
| terminology In this manual, the following terms are used for explanations. interpoint (interword separation)Host App: means the "Screen Share (Host)" application. interpoint (interword separation)View App: means the "Screen Share (View)" application. interpoint (interword separation)Host PC: This means the PC on which the "Screen Share (Host)" application is running. interpoint (interword separation)View DeviceScreen Share (View): This means the device on which the "Screen Share (View)" application is running. |
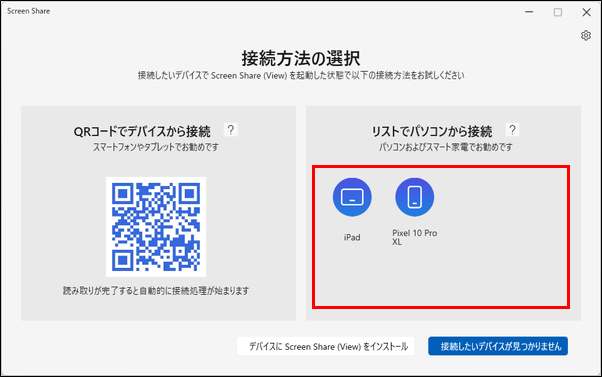
Application Screen Explanation
Screen Share (Host)" application
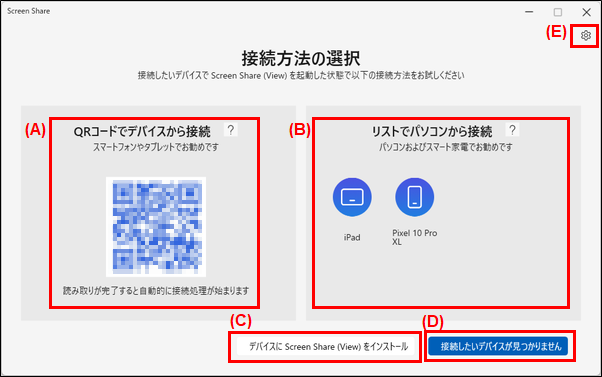
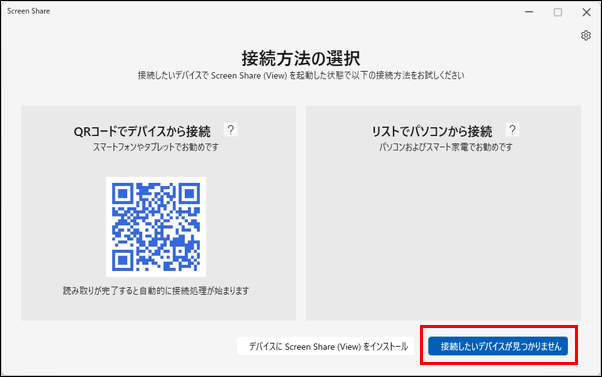
(A) Connect from device via QR code:. When connecting with a smartphone or tablet that has a camera function, the Host app and View app can be connected by reading the QR code with the "Scan QR Code" function of the View app.
(B) Connect from PC with list:. View devices that are connected within the same local network or that can be connected via Wi-Fi Direct will be displayed. Click the icon of the displayed device to initiate the connection.
(C) Install Screen Share (View) on the device:. If you do not know how to install the View application, click here and follow the on-screen instructions to install the View application.
(D) Cannot find the device you want to connect:. If there are no View devices within the same local network that can connect, or if there are no devices that can connect via Wi-Fi Direct, it is possible to try a mobile hotspot connection by clicking here.
(E) Configuration: (A) You can check the Host app settings and open the online manual.
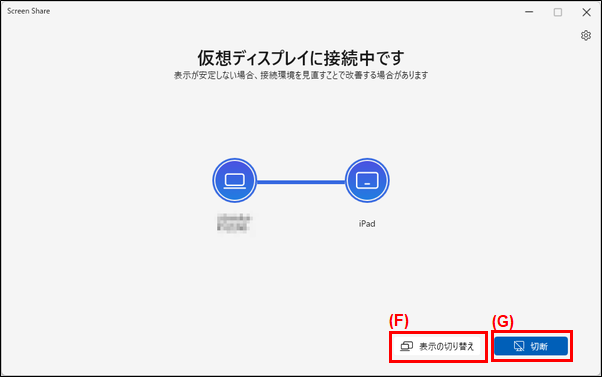
(F) Toggle display:. You can change the Windows display view to "duplicate" or "extended".
(G) Cutting: (G) Cutting Disconnect the Host and View apps and exit the external display view.
Screen Share (View)" application
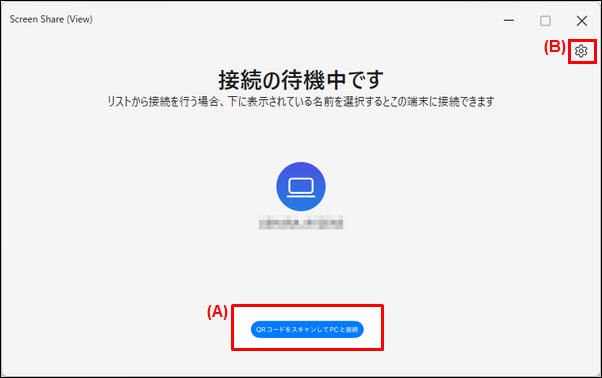
(A) Scan QR code to connect to PC: (B) Scan QR code to connect to PC: (C) Scan QR code to connect to PC When connecting with a smartphone or tablet with camera functionality, you can connect the Host app to the View app by reading the QR code displayed in the Host app; for Windows PCs and Google TVs, you can connect from the list of devices displayed in the Host app Windows PC or Google TV, the connection can be made from the list of devices displayed in the Host app.
(B) Configuration: (A) You can check the View app settings and open the online manual.

(C) Control panel:. The View app can be minimized, changed to windowed view, or disconnected by mouse operation on the View device. The Control Panel is only available for the Windows version of the View app.
Initial launch and preparation of the Host application
Start using Screen Share in the following ways
Close all applications you are working on. Save the file being created, if any.
2. Click the Windows "Start" button and select "All" in the upper right corner. From the list of applications, click "Screen Share (Host)".
The Screen Share (Host) application will start and User Account Control will be displayed. Click the "Yes" button.
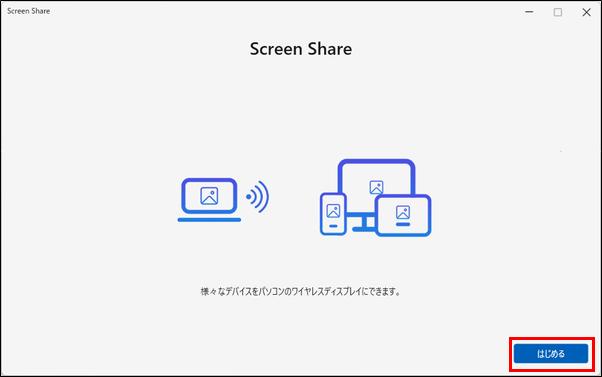
4. When the "Screen Share" screen appears, click the "Start" button.
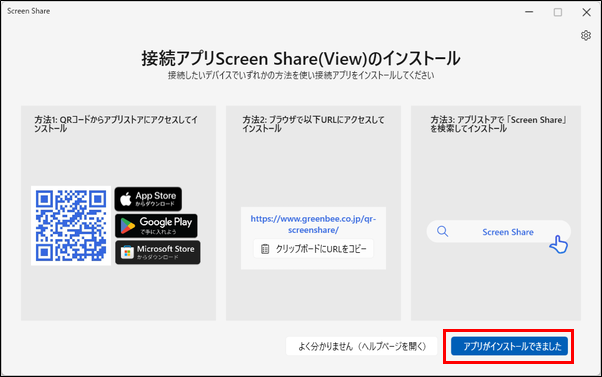
5. When the "Install Screen Share (View)" screen appears, follow the on-screen instructions to install "Screen Share (View)" on the View device and click the "Application is installed" button when finished.
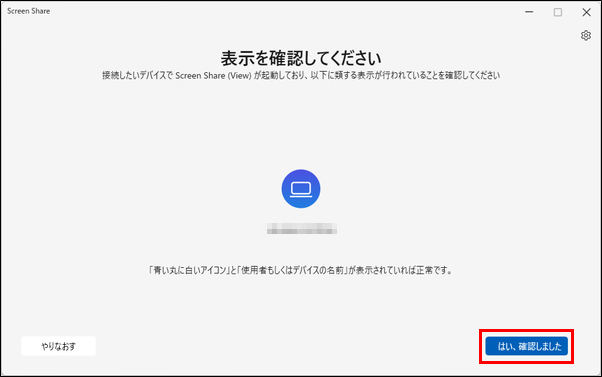
6. When the "Please confirm the display" screen appears, start the "Screen Share (View)" application according to the on-screen instructions, and click the "Yes, I confirmed" button after confirmation.
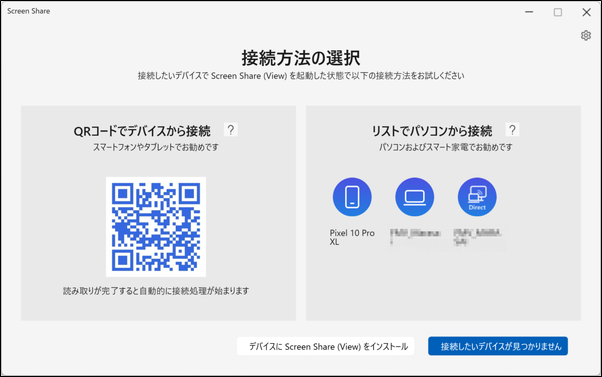
When the "Select Connection Method" screen appears, Screen Share is ready to use.
How to start using (local network connection)
Screen Share offers three connection methods. If the Host PC and the View device are connected to the same network, such as at home, a local network connection can be made. This section explains the procedure for local network connection.
| Tip! When connecting to a View device via a wireless LAN router or wireless LAN access point, the PC and View device must be connected to the same network, such as by connecting the PC and View device to the same wireless LAN router. Note that it does not matter if the PC or View device is connected to a wired LAN as long as they are on the same network. |
1. Connect your Host PC and View device to the same network and launch Host application. (e.g., connect your PC and smartphone to the same wireless LAN router)
2. Launch the View app on the View device, and the View device will appear in the Host app list.
3. Click the View device icon in the list to start the connection to the View application.
| Tip! The list displayed in the Host app shows both devices with local network connectivity and those with Wi-Fi Direct connectivity. Devices with Wi-Fi Direct connectivity have the word "Direct" on the icon. To make a local network connection, select an icon that does not have the word "Direct" on it. |

When connecting with a smartphone or tablet that has a camera function, you can also connect the Host app to the View app by scanning the QR code displayed in the Host app. Click "Scan QR code to connect to PC" in the View app, and then scan the QR code displayed in the Host app to start the connection to the View app.
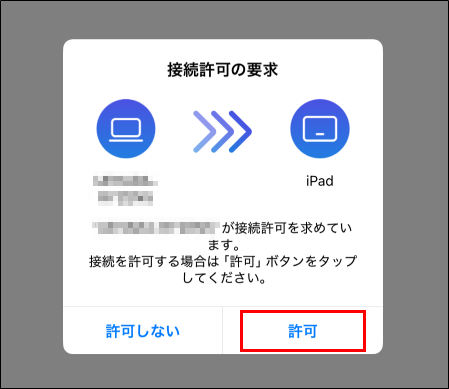
The View app will display a "Request permission to connect" screen. Select "Allow" to start the external display.
| attention (heed) - Only one device can be connected at a time. If you want to use another device, disconnect it and then connect it again with another device. - If you tap the "Do not allow" button shown in the View app, you will return to the connection standby screen. - If your wireless LAN router has enabled a function that restricts inter-device communication, such as a "privacy separator," you may not be able to establish a connection. For details, please refer to the manual of your wireless LAN router. - If you read the QR code displayed in the Host app from an iOS View device connected to a different local network, a "Pairing failed" error message will appear. After that, please check the Q&A in this manual from the error message, and if you read the QR code again without changing the network settings, the error message will not appear and the connection will not start. If this happens, please tap the "<" in the upper left corner of the screen or swipe the screen to the right to return to the "Waiting for connection" screen. |
How to start using (Wi-Fi Direct connection)
In environments where the Host PC and View device are not connected to the same network, such as cafes outside the home, schools, hotels, etc., a connection can be made using Wi-Fi Direct, a technology that allows direct Wi-Fi connections between devices. This section explains the procedure for connecting using Wi-Fi Direct.
| Tip! If your View device does not support Wi-Fi Direct, or if you have not enabled Wi-Fi Direct settings, you will not be able to connect via Wi-Fi Direct, Please check your device's manual or refer to the Q&A. |
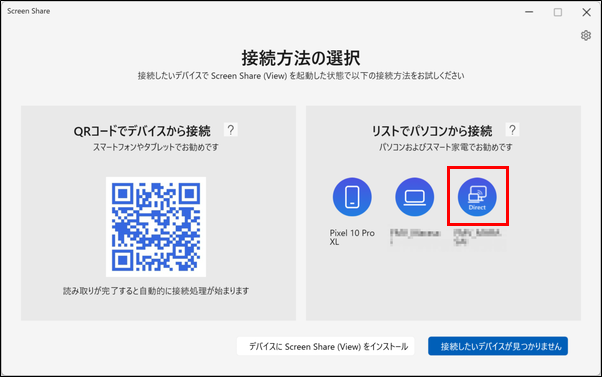
1. launch the Host and View apps, the View device will appear in the Host app list; for a Wi-Fi Direct connection, click on the View device icon with the word "Direct" on it.
| Tip! - The list displayed in the Host app shows both devices with local network connectivity and those with Wi-Fi Direct connectivity. Devices with Wi-Fi Direct connectivity will have the word "Direct" on the icon. - Some Wi-Fi Direct-enabled devices may appear in the Host app list even when the View app is not installed. Even if you try to connect to such devices, they will not be able to connect and you will not be able to use Screen Share. |
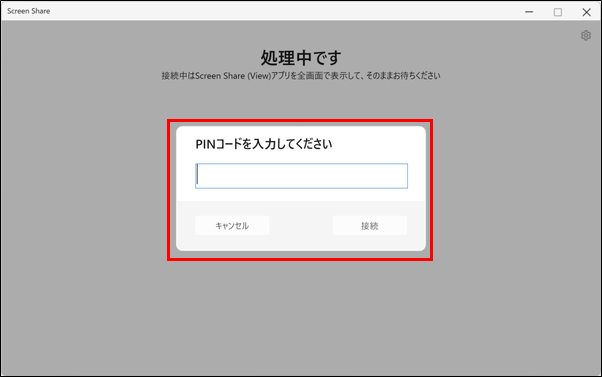
2. Click the View device icon displayed in the list, and the Host application will display a screen stating "Please enter PIN code".
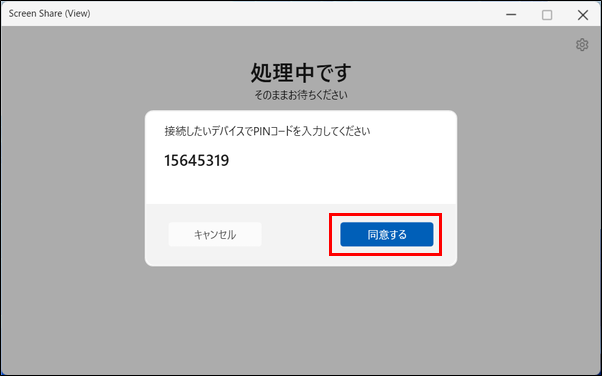
3. Then, click the "I agree" button on the PIN code screen displayed in the View application to start the connection to the View application.
The View app will display a "Request permission to connect" screen. Select "Allow" to start the external display.
| Tip! If the Wi-Fi Direct connection fails, the following English error message may appear. Host App - Pairing error: RejectedByHandler This message is displayed when the connection is canceled by the Host application. - Pairing error: InvalidCeremonyData This message is displayed when the "Connect" button is clicked without entering the correct PIN code. View application (Windows) - Pairing error: Failed This message is displayed when the Host application cancels the connection, or when the "Accept" button is clicked without entering the correct PIN code. |
| attention (heed) - When entering the PIN code for Wi-Fi Direct connection, you can cancel the Wi-Fi Direct connection by clicking the "Cancel" button on the Host application. In this case, be sure to click the "Cancel" button to close the PIN code dialog displayed on the View device, as it will not close automatically. - If you try to make a local network connection from the Host application to the View device while the PIN code dialog is displayed on the View device, the connection cannot be made successfully. Before connecting, check the status of the View device, and be sure to close the PIN code dialog if it is displayed. |
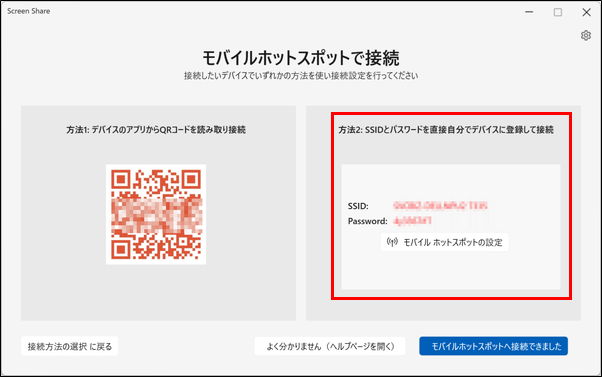
How to start using the service (Mobile Hotspot connection - read the QR code to connect)
In environments where neither local network connection nor Wi-Fi Direct is available, a mobile hotspot connection can be used to connect devices by using a PC as a simple Wi-Fi router. There are two ways to connect to a Mobile Hotspot connection (by reading a QR code or manually setting up a connection).
| attention (heed) Connections using the mobile hotspot function may result in slower communication speeds and slightly slower screen rendering than connections using a wireless LAN access point. If the Host PC and View device can communicate via a wireless LAN access point, it is recommended to use a connection method that does not use the Mobile Hotspot feature. |
1. Start the Host application and click the "Cannot find the device you want to connect" button.
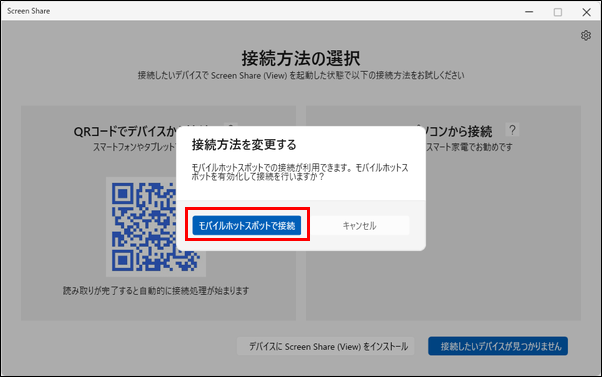
When the "Change Connection Method" dialog box appears, click the "Connect with Mobile Hotspot" button.
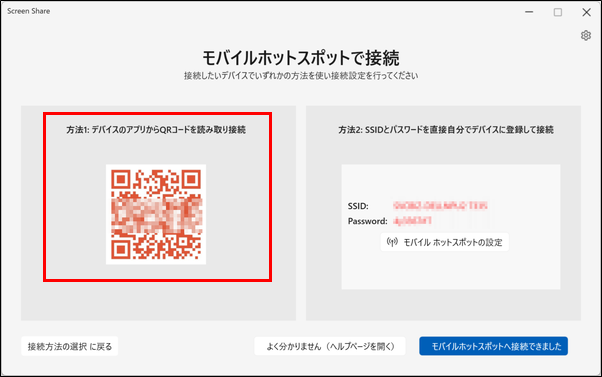
3. the "Connect with Mobile Hotspot" screen will appear, showing two connection options (read the QR code to connect or set up the connection manually).
4. If you are connecting with a smartphone or tablet that has a camera function, you can make a mobile hotspot connection by reading the QR code. Start the standard camera app on your phone or tablet and read the "Method 1" QR code displayed in the Host app, and the Wi-Fi connection will be made automatically first.
| attention (heed) - When using a QR code to connect to the mobile hotspot, be sure to read the code with the standard camera app on your phone or tablet; the connection cannot be made by reading the QR code with the View app. - If you cannot read the QR code with the standard camera app on your phone or tablet, try connecting using the "How to set up the connection manually" in the next section. |
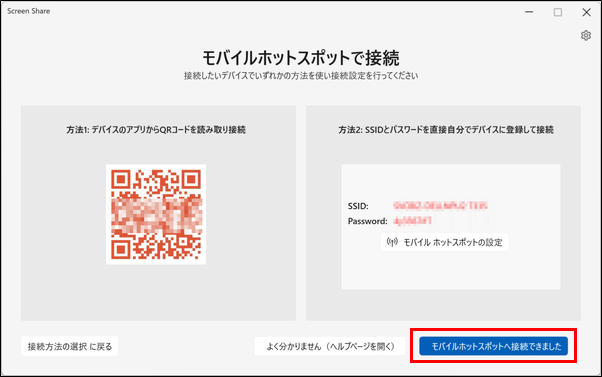
When the Wi-Fi connection is complete, click the "You are connected to a mobile hotspot" button.
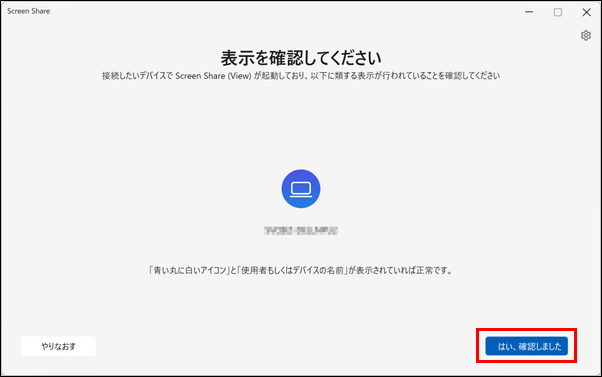
6. launch the View app and click the "Yes, I have confirmed" button displayed in the Host app with the View app displayed at the top of the screen.
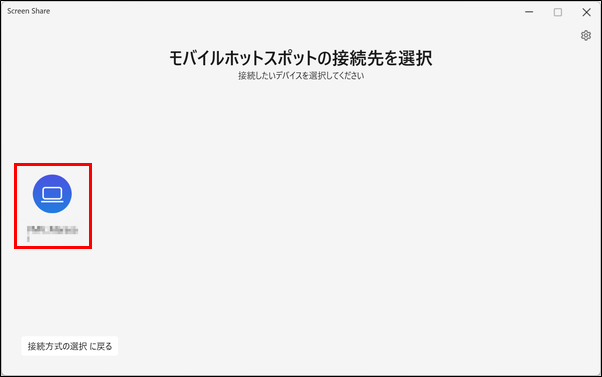
When the "Select Mobile Hotspot Destination" screen appears, confirm that the icon for the View device is displayed and click on the icon to start the external display display.
How to start using (Mobile Hotspot connection - how to set up the connection manually)
Continuing from the previous section, this section explains the procedure for "manually setting up a connection" for a mobile hotspot connection.
| attention (heed) Connections using the mobile hotspot function may result in slower communication speeds and slightly slower screen rendering than connections using a wireless LAN access point. If the Host PC and View device can communicate via a wireless LAN access point, it is recommended to use a connection method that does not use the Mobile Hotspot feature. |
1. Start the Host application and click the "Cannot find the device you want to connect" button.
When the "Change Connection Method" dialog box appears, click the "Connect with Mobile Hotspot" button.
3. the "Connect with Mobile Hotspot" screen will appear, showing two connection options (read the QR code to connect or set up the connection manually).
If you are connecting with a device that does not have a camera function, you can make a mobile hotspot connection by making a manual Wi-Fi connection: open "Wi-Fi Connection Settings" in the OS settings of the View device and select the Wi-Fi network with the name listed under "SSID:" in "Method 2" displayed in the Host app. Select the Wi-Fi network with the name listed in "SSID:" in "Method 2" displayed in the Host app.
Next, enter the string listed in "Password:" in "Method 2" displayed in the Host application into the "Wi-Fi Connection Settings" of the View device to complete the connection.
| Tip! For detailed instructions on "Wi-Fi Connection Settings" for View devices, please refer to the View device manual. |
When the Wi-Fi connection is complete, click the "You are connected to a mobile hotspot" button.
Start the View app, and with the View app displayed at the top of the screen, click the "Yes, I have confirmed" button displayed in the Host app.
When the "Select Mobile Hotspot Destination" screen appears, confirm that the icon for the View device is displayed and click on the icon to start the external display.
Operation after start of use
Once the connection is initiated, the Host PC becomes a multi-display environment, and the Sink device displays the Host PC desktop screen in the same way as a normal external display.
You can also change the View application's display method ("Expand" or "Duplicate"), zoom in/out, resolution, and screen orientation settings as desired from the Host PC's OS settings.
| Tip! The zoom in/out setting (magnification ratio) of the external display screen created by Screen Share can be freely set, but the display is guaranteed only when the 100% setting is used. If you change the zoom in/out setting and the display does not work properly, please change the setting to 100%. |
Disconnection
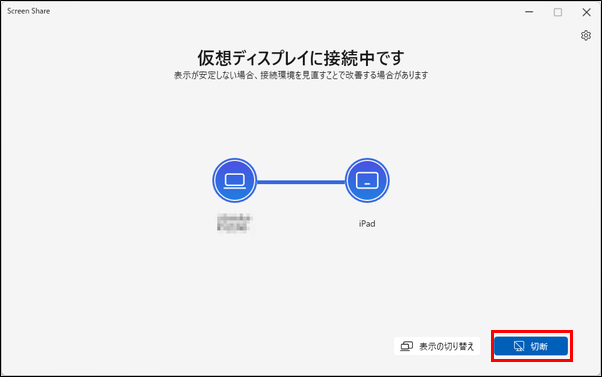
To disconnect from the Host PC, click the "Disconnect" button displayed in the Host application.

When disconnecting from a View device, the disconnection method differs depending on the device type.
For the View application in Windows, use the mouse on the View device and move the mouse cursor to the top of the screen to display the "Control Panel". Clicking the "X" button in the "Control Panel" will disconnect the connection.
For iOS or Android View apps, closing the app (task kill) will disconnect the connection.
Exit Screen Share (Host) application
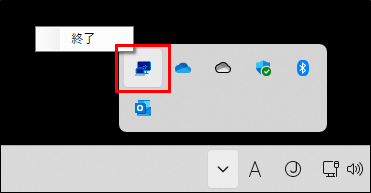
The Host application resides in the Windows task tray even after the application is closed.
To exit the Host application, right-click the "ScreenShare" icon that appears in the Windows task tray and select "Exit".
Each item in the application settings
Host app settings screen
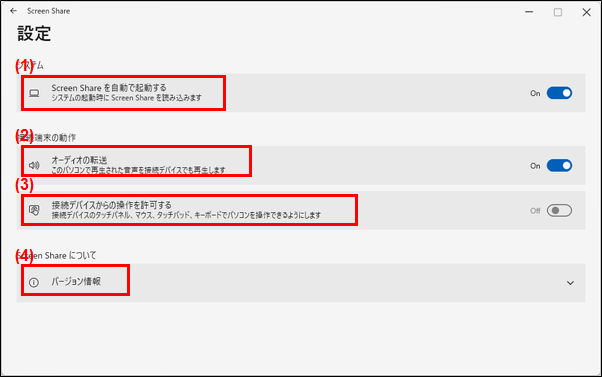
1. automatically launch Screen Share
When the setting is turned on, Screen Share will automatically launch when the Host PC is started up and reside in the task tray.
2. audio transfer
When the setting is turned on, the audio played on the Host PC is also played on the View device.
3. allow operation from connected devices
Once the setting is turned on, the Host PC can be operated by mouse, keyboard, or touch operation of the View device.
Version information
View this online manual, privacy policy, and other software license information.
| Tip! When the "Audio Transfer" setting is turned on, the sound from the external device does not stop even if the Host PC's sound is muted; the audio output settings for the Host PC should be configured on the Host PC and the audio output settings for the View device should be configured on the View device. |
| attention (heed) - When connecting a device with a touch panel, touch panel operation is supported only by touch; other operations such as swiping are not supported. - Pen input for devices with touch panels is not supported. - Multi-touch is not supported for devices with touch panels. - Long-tap operation for devices with touch panels is not supported. - When the "Allow operation from connected devices" setting is turned on, the mouse and touchpad on the View device can only operate the screen on the View device, not the screen of the Host PC. - When the "Allow operation from connected devices" setting is turned on, pressing the "Windows key + L key" on the keyboard of the external device will lock both the Host PC and the external device. To unlock the lock screen, perform the unlock operation on both the Host PC and the external device. - When the "Allow operations from connected devices" setting is turned on, pressing the "Fn key + Fx key" (Fn+F5, Fn+F8, etc.) on the external device keyboard will operate on both the Host PC and the external device as if the same key was pressed on both the Host PC and the external device. In addition, what "Fn key + Fx key" operates depends on your PC and keyboard. - When connecting to a Windows View device, if the "Allow operation from connected devices" setting is OFF, the mouse cursor of the View device may not appear on the external display after connection, and some dialogs displayed on the View device may not be operable. In such cases, please disconnect the connection from the Host application or temporarily turn on the "Allow operation from connected device" setting and operate the device from the View device. - Depending on the condition of the device with touch panel, the touched position and the place where the operation is actually specified may shift. - When the "Allow operation from the device you are connecting to" setting is OFF, keyboard operation from the View device may become possible when the connection is made. In this case, please turn on the "Allow operation from the device you are connecting to" setting once and turn it off again. |
View app settings screen
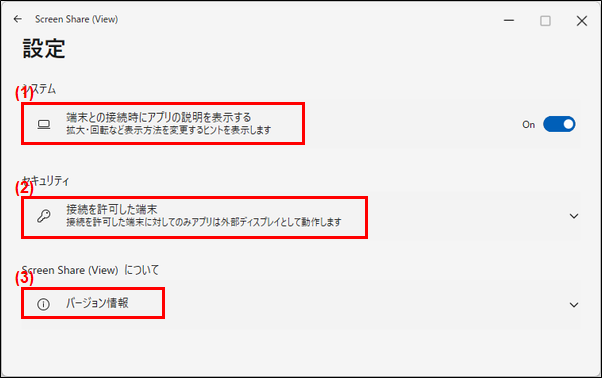
1. display application description when connecting to a device
When the setting is turned on, the View app will display a hint to change the display method, such as zoom in or rotation, when connecting to the Host PC.
2. terminals that are allowed to connect
Displays a list of Host PCs to which you have previously connected and allowed connections. It is also possible to cancel connection permissions for each Host PC from the settings, making it necessary to request permission to connect again.
Version information
View this online manual, privacy policy, and other software license information.
List of keyboard operations
List of keys, special keys, and shortcut keys available from the View device
| numeric key | English Key | Full/Half-width key |
| Tab key | CAPS key | SHIFT key |
| CTRL key | ||
| CTRL + C | CTRL + V | CTRL + Z |
| Windows + E |
| attention (heed) - When input is made from the View device keyboard, the key commands issued by the View device keyboard input are transferred directly to the Host PC, and the Host PC interprets and executes the key commands in the same way as if they were entered on the PC. The Host PC interprets and executes the key commands as if they were entered on the PC, so the results of the operation may not be as indicated on the keyboard of the View device. - ScreenShare supports keyboard input only when using a Japanese-compatible keyboard. If the keyboard is not a Japanese-compatible keyboard, such as an English keyboard, or if the keyboard is recognized as an English keyboard even if it is Japanese-compatible, the "Halfwidth/Fullwidth" key and the "Caps Lock" operation cannot be accepted. |
precautions
- This application works by sending compressed screen data over a network and displaying it after decompressing it on the receiving side. Due to the time required for this processing, there will be a delay in the display and a reduction in the number of frames displayed compared to the display on an external display that processes at high speed, such as an HDMI connection.
- When the Host PC or an external device uses wireless LAN to connect to the Host PC, if the Host PC is used in an area where there are many wireless LAN devices or where there is radio congestion or interference, such as near a microwave oven, the surrounding radio waves may cause delays or inoperability, or screen display delays or distortion. The following is a list of the most common causes of radio frequency interference.
- If you create another user account on a PC that is connected to a View device with Screen Share and switch to another user account without signing out, the Screen Share connection in use will be maintained, but the Screen Share application will not be able to operate.
- If you create another user account on the PC where you are using Screen Share (View) and switch to another user account without signing out, the connection to Screen Share in use will be maintained, but the display as an external display will not be performed. Signing in again to the original user will resume the display as an external display.
- If the Host PC goes into an inactive screen off state or lock screen for a certain period of time, the screen of the View device will be a solid black screen during that time.
- Depending on the connection environment between the Host PC and the View device, a wireless LAN error message may appear when disconnecting Screen Share, but this is only when the application cannot detect Screen Share disconnection and is not abnormal behavior This is not abnormal behavior.
- If the iOS device is level to the ground (e.g., placed horizontally on a desk), the View app may not correctly determine the vertical or horizontal orientation of the View device, causing the screen to rotate.
- When the View app for iOS is launched for the first time, even if the local network connection permission is not allowed, your device may be able to use Screen Share to display the screen as an external display. In addition, even if you perform touch operation on this View device, you will not be able to perform touch operation and the View app will display the message "Local network connection permission is not allowed, please allow it. In such a case, please go to the iOS settings, open "Apps" - "Screen Share (View)" and turn on the "Local Network" setting.
- If you did not allow local network connection privileges when you first launched the View app for iOS, and then installed the View app again and allowed local network connection privileges, the Host app may not appear in the list of devices to which the Host app is connected. In this case, exit the View app and re-launch it.
Devices supported by the View app
| Windows PC | - Windows 11 22H2 or later - Wired LAN or Wi-Fi network access |
| iOS devices | - iPhone or iPad with iOS 15 or later |
| Android phones and tablets | - Android phone with Android 10 or later, or Android tablet |
| Google TV | - Google TV with Android 10 or later |
| attention (heed) Even if the above conditions are met, we cannot guarantee operation on all devices or environments. |
Q&A
| While using Screen Share, the Host PC displays a notification saying "The communication speed required to use the application is not available. |
|---|
| Depending on the connection environment and connection method between the Host PC and View device, the communication speed required for screen display sent from the Host PC to the View application may not be achieved. The communication speed may be improved by the following methods. Set the Screen Share connection method to "Local Network Connection". If you are using a PC, use a wired LAN cable to connect to the network as much as possible. Keep the distance between the Host PC and the View device as close as possible. Use 5GHz band Wi-Fi such as "11n", "11ac", and "11ax". |
| Changing the volume setting or muting the Host PC does not change the setting of the sound played on the View device. |
|---|
| The application settings allow the Host PC sound to be played on the View device, but the PC sound is not automatically muted. Also, the volume setting of the Host PC is not reflected in the volume of the View device; the volume of the Host PC and View device should be adjusted on each device. |
| Sound playing from View device is interrupted. |
|---|
| When using wireless communication with this application, sound may be interrupted depending on the signal conditions if the Host PC's sound is set to sound on the View device. Factors that may cause unstable signal conditions include the following Distance between Host PC and View device is too far away. There is an obstruction between the Host PC and the View device. Wi-Fi in the 2.4GHz band is being used, and there is interference from other devices. [Examples of devices using the 2.4GHz band]. Microwave Oven Telephone handsets Wireless mice and keyboards |
| Screen does not appear on external display or playback stops when playing Blu-ray or TV |
|---|
| Some apps running on the Host PC do not allow content to be displayed on the View device. When using such apps, the app screen will not be displayed on the external display screen created by Screen Share. Example: Blu-ray playback screen, etc. |
| I don't know how to set up a Wi-Fi Direct connection on my Android device |
|---|
| If you are unable to make a Wi-Fi Direct connection with your Android device, please try the following method to connect. Caution! - Depending on your Android device, Wi-Fi Direct connection may not be supported. - Please be sure to refer to the manual of your Android device for details, as the Wi-Fi Direct setting method and names of each setting differ depending on the Android device you are using. Launch the Host application. Open "Settings" on your Android device. Open "Network and Internet" - "Internet" - "Network Settings" - "Wi-Fi Direct". Click on the View device icon that appears in the Host app list with the word "Direct" listed. 5. When the Host application displays a screen stating "Please enter PIN code," enter the PIN code for the connection displayed on the View device and click the "Connect" button. 6. Then, click the "I agree" button on the PIN code screen displayed on the View device to start the connection to the View device. 7. After a while after starting the View application, the View application will display a "Request for connection permission" screen. |
| While using Screen Share on Google TV, the TV screen turns off or turns off after a certain time. |
|---|
| If settings such as "energy saving mode", "no operation off", "sleep timer", or "turn off screen" are enabled within Google TV's settings, Google TV's screen may turn off or turn off after a certain time. While using Screen Share, these settings may be "off and "Disabled" or extend the set time. |
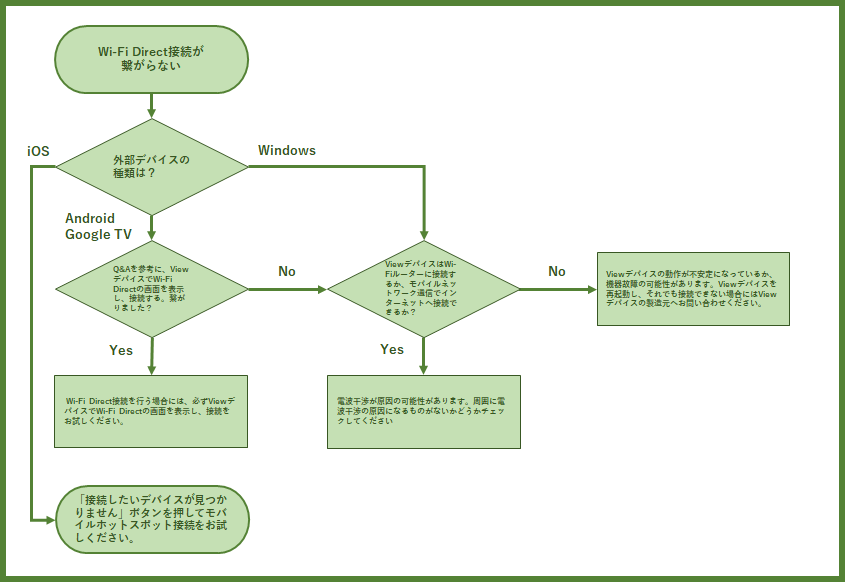
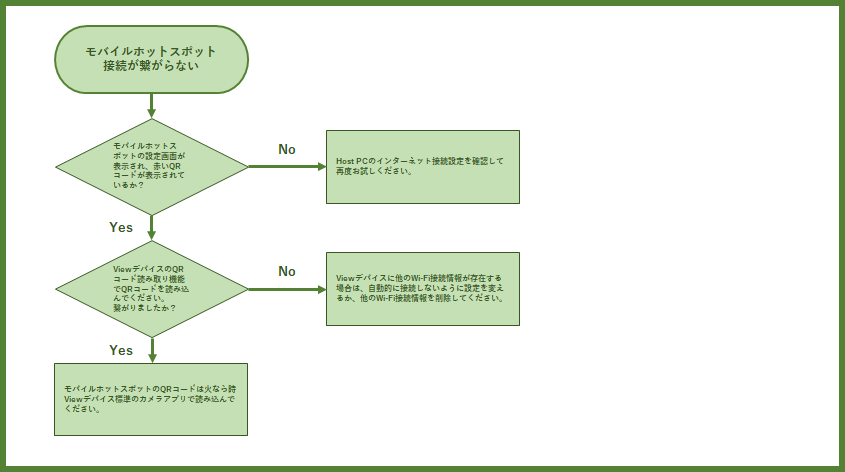
Troubleshooting

Microsoft and Windows are either registered trademarks or trademarks of Microsoft Corporation in the United States and/or other countries.
Blu-ray is a trademark of the Blu-ray Disc Association.
Android and Google TV are trademarks of Google LLC.
iOS is the name of the operating system of Apple Inc. IOS is a registered trademark or trademark of Cisco Systems, Inc. or its affiliates in the United States and other countries and is used under license.
iPhone and iPad are registered trademarks of Apple inc. *The iPhone trademark is used under license from Aiphone Co.
App Store is a service mark of Apple Inc. registered in the United States and other countries.
Wi-Fi and Wi-Fi Direct are trademarks or registered trademarks of the Wi-Fi Alliance®.
QR Code is a trademark or registered trademark of DENSO WAVE INCORPORATED.
All other company names and product/service names are trademarks or registered trademarks of their respective owners. Some TM, (R) marks, etc. are not indicated in the text.